.png)
ActiveProspect Trusted Form Setup (Updated for SDK Auto Retain Integration)
TrustedForm is one of the highest standards of independent proof of consent and it’s our recommended approach for collecting proof of consent at LeadCapture.io.
But getting started with ActiveProspect TrustedForm can sometimes be a little daunting at first.
That’s why in this guide, we’ll walk you through the updated process of integrating ActiveProspect TrustedForm using our new SDK-based approach, no more copying and pasting JavaScript!
What’s New?
We’ve upgraded our TrustedForm integration to use the TrustedForm SDK, allowing for more reliable certificate retention and simplified setup.
IMPORTANT: If you previously added the TrustedForm script manually under Custom Code, make sure to remove it before enabling the new SDK toggle. Using both can lead to duplicate or broken certificates.
How do I implement TrustedForm into my form to claim a TrustedForm Certificate?
The process of integrating ActiveProspect TrustedForm might seem confusing depending upon what form tool you’re using — but at LeadCapture.io we’ve made this possible with just two easy steps .
Let’s explore the steps below:
Prerequisites:
1) ActiveProspect Trusted Form Account: You can grab a free account here.
2) LeadCapture.io Account: You can grab a free trial here
Please follow the TrustedForm implementation steps below:
Step 1: Enable the TrustedForm SDK
- Go to your LeadForm Builder in LeadCapture.io
- Navigate to the Lead Delivery tab
- Scroll to the TrustedForm section
- Toggle ON the TrustedForm integration
-
Click Save
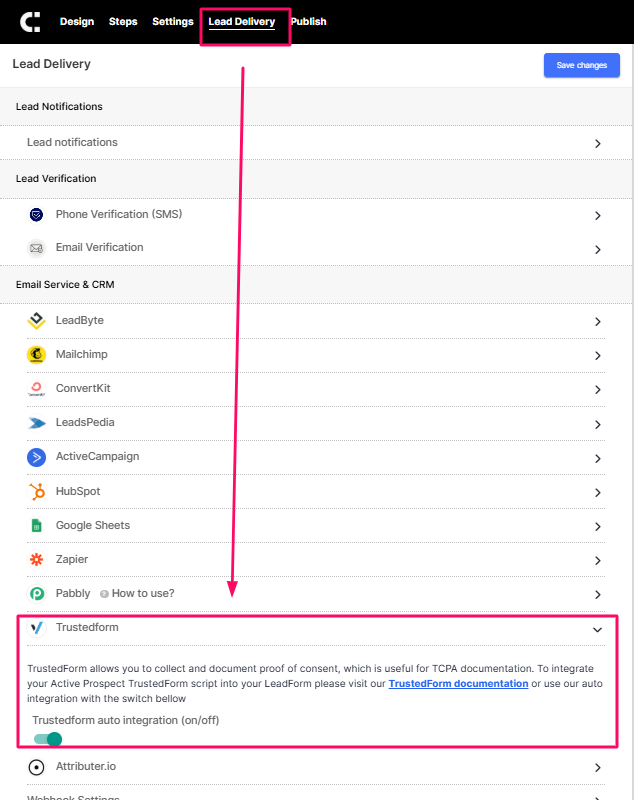

This automatically injects the enhanced TrustedForm SDK script into your form, no need to paste any custom code!
Step 2: Create a Hidden Field to capture the unique TrustedForm Cert URL
Now that the TrustedForm SDK is automatically injected when you enable the toggle, the next step is to create a hidden field that will capture the dynamically generated certificate URL.
First, choose a step where you’d like to add your hidden field. In this case, I’m going to place the hidden field on my contact form step.

Inside of the Contact Form step click on the blue ‘Add Field Button.’

Next set the field type to “Hidden hardcoded field” — this will allow you to grab the dynamically generated value from the TrustedForm script.

Finally, update the field name to anything that you’d like it to be and field label to say:
xxTrustedFormCertUrl
Please keep the ‘Hardcoded field value’ field blank.

After you add the values click ‘Save form field’ and the hardcoded hidden field will be added to the form.
Since this field is hidden, you won’t see it in the LeadForm itself, but you will see it over on the left hand side of the screen like in the image below:

And just like that your LeadForm is now fully integrated with ActiveProspect TrustedForm.
The next step is to send a test lead through from a live page.
Where to access your TrustedForm Cert with each lead:
You can access the certification in the following areas:
- Lead notification
- JSON payload if using our Webhook
- Lead Details Page
- ActiveProspect’s LeadConduit (if using their LeadConduit product)
Each certification URL will be stored with each lead in the ‘Lead Details’ page of LeadCapture.io. Simply locate your list of leads within the LeadForm and click ‘Open Details’.

Next, look for the field named xxTrustedFormCertUrl – this is where you’ll see the unique certification URL that was dynamically generated by the ActiveProspect TrustedForm script.

You can even navigate to the URL provided to see an example of how the certification looks in the browser.
I also recommend pushing the certification URL into your CRM using either Zapier or one of our many integrations.
Storing Your TrustedForm Cert in ActiveProspect LeadConduit:
If you’re using ActiveProspect’s paid features such as LeadConduit then you can also store your TrustedForm Script inside of LeadConduit.
Here’s some additional information about retaining and claiming your TrustedForm certs in LeadConduit.
Migrating from the Old Setup?
If you previously added the TrustedForm JavaScript manually under the Publish > Custom Code section:
- Remove the manual script
- Enable the new toggle under Lead Delivery > TrustedForm
- This ensures you’re using the updated, SDK-powered method
- Do not use both methods at the same time, they may conflict and cause duplicate certs