.png)
LeadProsper Direct Integration: How to send leads into LeadProsper
Our LeadProsper integration makes it easy to post leads directly into LeadProsper.
This guide walks you through how to:
- Add the LeadProsper integration to your form inside Lead Delivery
- Set up your LeadProsper campaign, supplier, test mode, and buyer
- Configure the required fields from your LeadProsper Posting Guide
- Optionally enable dynamic redirects based on buyer responses
- Access and use your LeadProsper API Specs (Posting Guide)
- Avoid common formatting issues like state and phone number errors
Key Links
- Sample Posting Guide: Example Posting Guide
- Lead Prosper Direct Post Documentation: Lead Prosper Support
Getting Started Inside LeadProsper
Before connecting your LeadForm to LeadProsper, make sure your campaign is properly set up inside the LeadProsper platform. The following steps are required before you can access the Posting Guide or receive leads.
Step 1 – Create a Direct Post Campaign in LeadProsper
Before integrating with LeadCapture, you’ll need to create a Direct Post Campaign inside your LeadProsper account.
- In the left-hand menu, click on the Campaigns tab.
- Click the 'New' button in the upper right corner.

- In the Add Campaign modal that appears:
- Enter your Campaign Name (this can be the name of your form, landing page, or project).
- Under Campaign Type, select Direct Post.

Once done, click 'Create' to move to the next step of campaign setup.
This is required in order to connect your LeadCapture form to LeadProsper using the built-in integration.
Step 2 – Set Up a Supplier
Once your campaign is created in LeadProsper, the next step is to create a Supplier and keep the campaign in Test Mode during setup and testing. When you create a new Supplier, they are placed in Test Mode by default. Leads sent to a supplier in Test Mode will be treated as test leads and will not be delivered to buyers until the supplier is switched to Live.
How to Create a Supplier:
- From inside your campaign, scroll to the Suppliers section.
- Click the New button to add a new supplier.

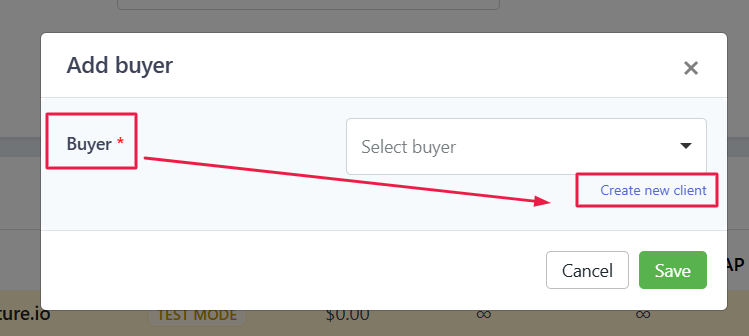
- In the Add Supplier modal, click Create new client.

- Fill out the required fields:
- Company name – Use your company name or the name of the lead form
- Email, phone, and contact name are optional but can be filled in for internal use
- Click Save.

Test Mode ensures no leads are sent to real buyers during your setup and testing phase.
Step 3 – Add a Test Buyer (Required for API Specs)
In order to access the API specs (Posting Guide), you must first add at least one buyer to the campaign.
-
Go to the Buyers tab inside your campaign.

-
Create a Test Buyer (e.g., “Test Customer”).
- This step is required in order to unlock the campaign’s API documentation.
- Once buyer is created, click 'Store lead' and hit 'Save'


Step 4 – Access Your Campaign API Specs
Once a test buyer is created, you can access your API specs by going to:
Campaign > Supplier API Specs

From this page, you'll find:
- Your lp_campaign_id, lp_supplier_id, lp_key
- The full list of field parameters

Steps for Setting Up LeadProsper Integration inside LeadCapture.io
Step 1 – Add the LeadProsper Integration
To connect your lead form to LeadProsper:
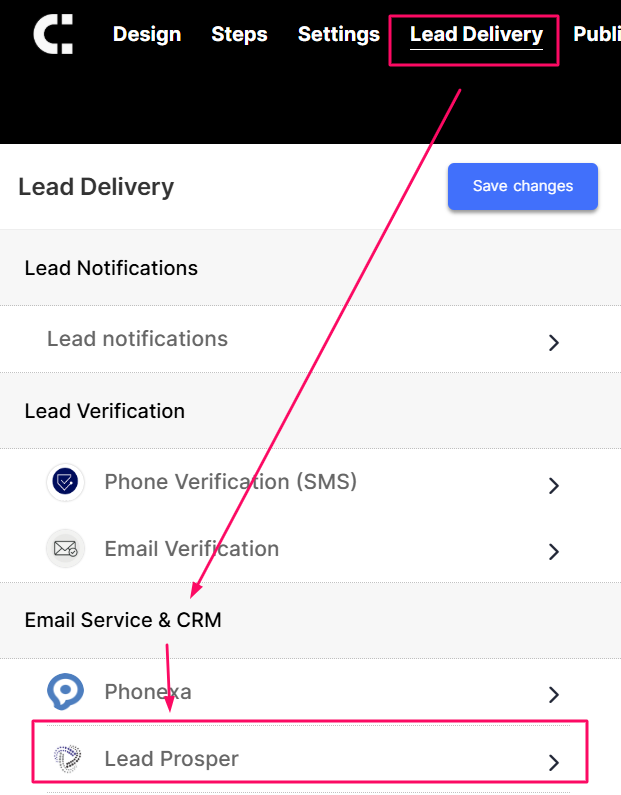
- In the form builder, go to the Lead Delivery tab.
- Under Email Service & CRM you'll see list of integrations.
-
From the list of integrations, choose LeadProsper.
- Fill out the following fields using your Posting Guide:

Required fields:
- Lead Prosper Campaign ID
- Lead Prosper Supplier ID
-
Lead Prosper Key
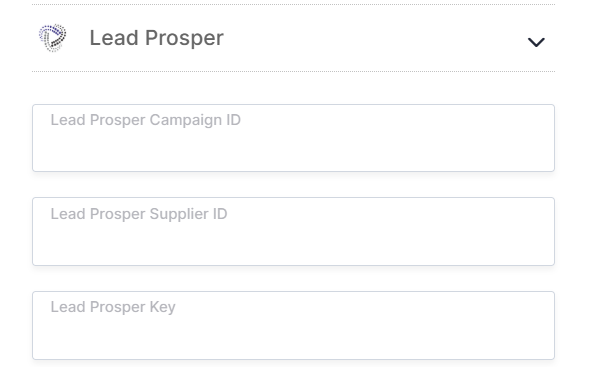

These three fields are mandatory. If any of these are missing or incorrect, the form will not be able to deliver leads to LeadProsper.
Optional fields:
- Lead Prosper Action – Only required if your Posting Guide explicitly includes it.
- Redirect URL Field – Used to dynamically redirect users after submission (see next section).
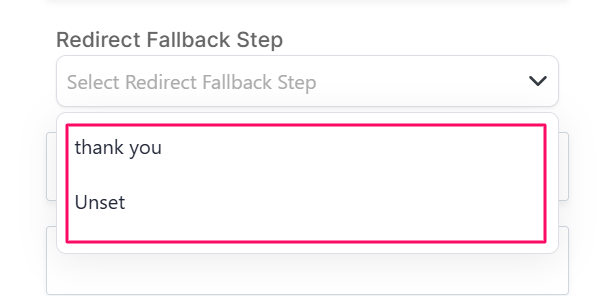
- Redirect Fallback Step – The step your form will redirect to if a dynamic URL is not returned.
You no longer need to create hidden fields to pass required values. All mapping and delivery can be handled directly through the built-in integration interface.
Step 2 – (Optional) Enable Dynamic Redirect
If your LeadProsper campaign is set up to return a redirect URL after lead acceptance, you can use this to send users to a specific thank-you page based on the buyer’s setup.
To enable this:
- In the Redirect URL Field, enter:
redirect_url
This must match exactly.

-
Set a Redirect Fallback Step to ensure users are redirected somewhere even if a dynamic redirect is not returned or if the lead is rejected.
-
On the LeadProsper side, ensure your campaign is configured to return a redirect URL.
If your buyer is configured to return a redirect URL in the response, LeadProsper allows that value to be passed back to the form and used for redirection. This is especially useful when different buyers want to send users to custom thank-you pages.
For full instructions on how to configure this on the buyer side, see LeadProsper’s official guide: Returning a value to a supplier’s API from a buyer’s response
When configured correctly, users will be redirected to the thank-you page assigned by the buyer in LeadProsper. This setup is especially useful if you sell leads to multiple buyers and want a more personalized post-submission experience.


Step 3 – Map Form Fields to LeadProsper
Once the integration is added, you’ll need to ensure each input field in your form is mapped to the corresponding LeadProsper field name. This tells the form where to send each data point (name, email, phone, etc.).
To map fields:
- Go to each step of your form that contains an input field (e.g., text, email, phone).
-
Under Form Fields, Click the pencil icon to open its settings.
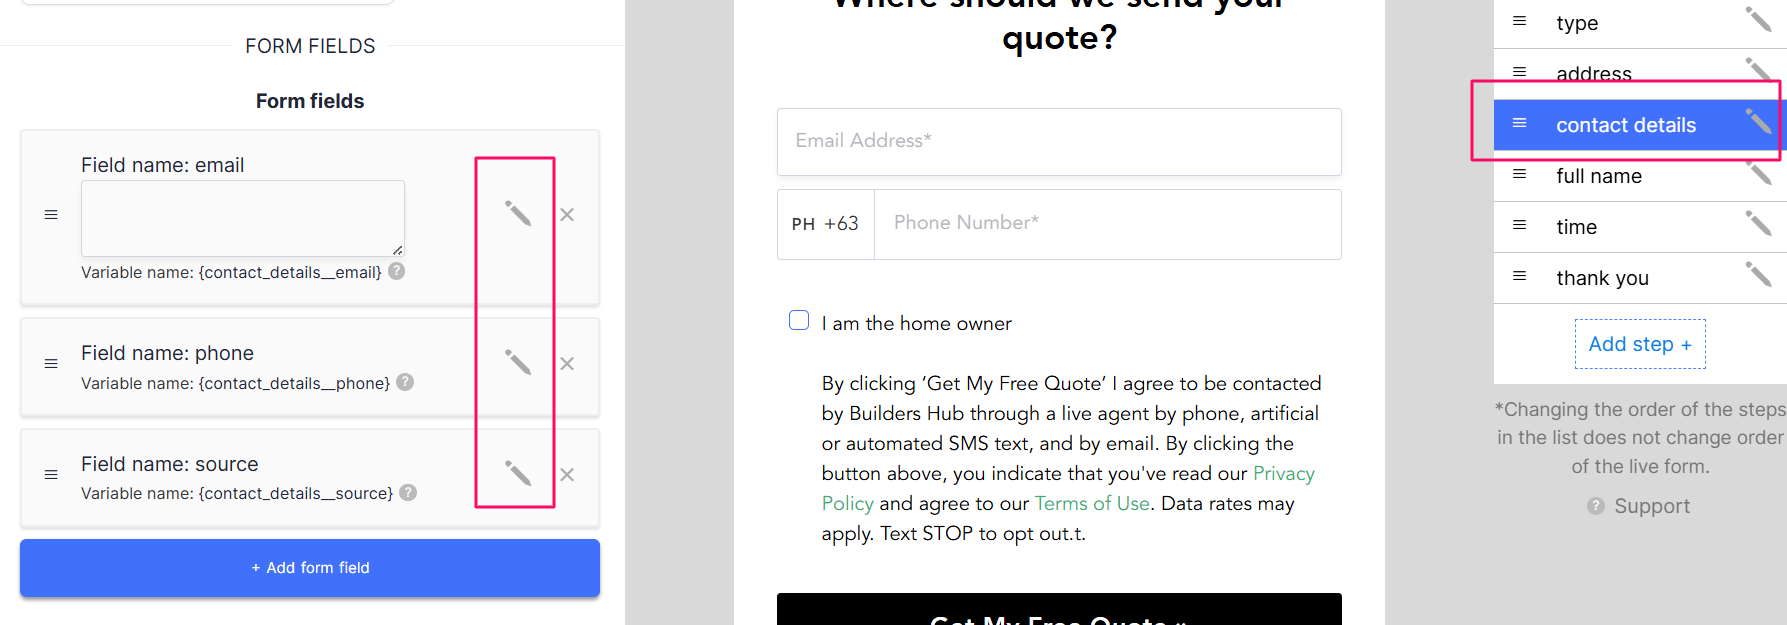
-
Select LeadProsper from the list.
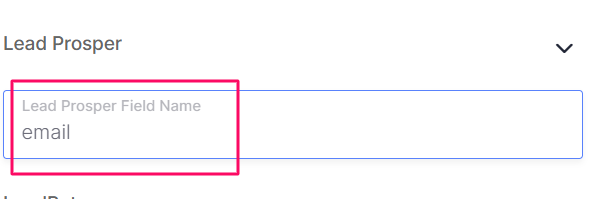
- In the field name input, enter the exact parameter name shown in your Posting Guide.


Repeat this for each field you want to post to LeadProsper.

Be precise: Field names are case-sensitive and must match what LeadProsper expects. For example, if the Posting Guide says
first_name, don’t enterFirstNameorfirstName.
Question/Response Steps
If you’re using question-style steps, you’ll need to map each response using Advanced Options:
- Go to the Steps tab of your form.
- Scroll down to Advanced Options section.
- Under Lead Delivery Settings, select LeadProsper from the list.
-
In the field name input, enter the exact parameter name from your LeadProsper Posting Guide.
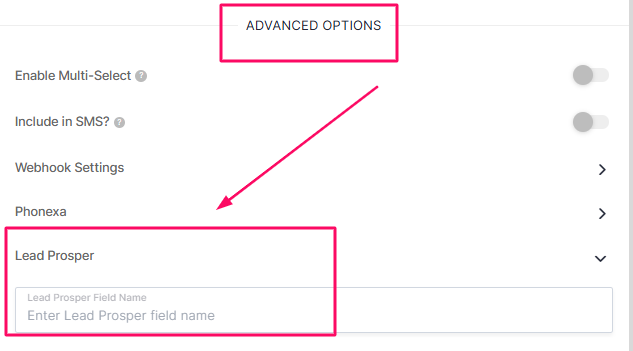

Repeat this for every question-style step you want to include in the lead delivery.
Common Errors & How to Fix Them
These are some of the most frequent formatting issues that cause leads to fail or be rejected by LeadProsper. Make sure your form inputs are correctly formatted based on the campaign’s API specs and validation settings.
State Field Formatting
Expected Format:
- Must be a two-letter abbreviation (e.g.,
CA, notCalifornia) -
Case-insensitive (
cais accepted, butCaliforniais not)
How to Avoid This Error:
- If you’re using the Google Address Autocomplete field in your LeadCapture form:
-
Go to the settings tab> Google address autocomplete> Use Short State State > Toggle on
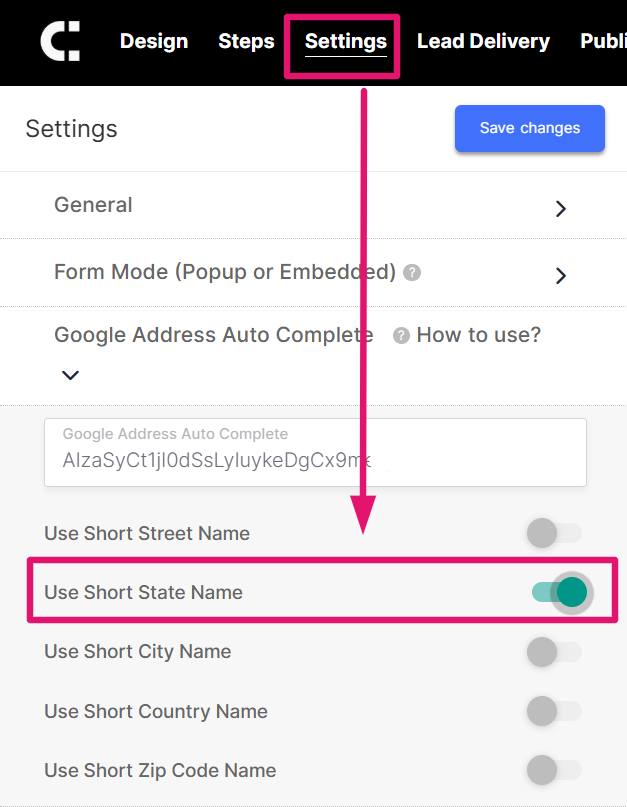
-

This ensures that the state sent to LeadProsper is in the correct format.
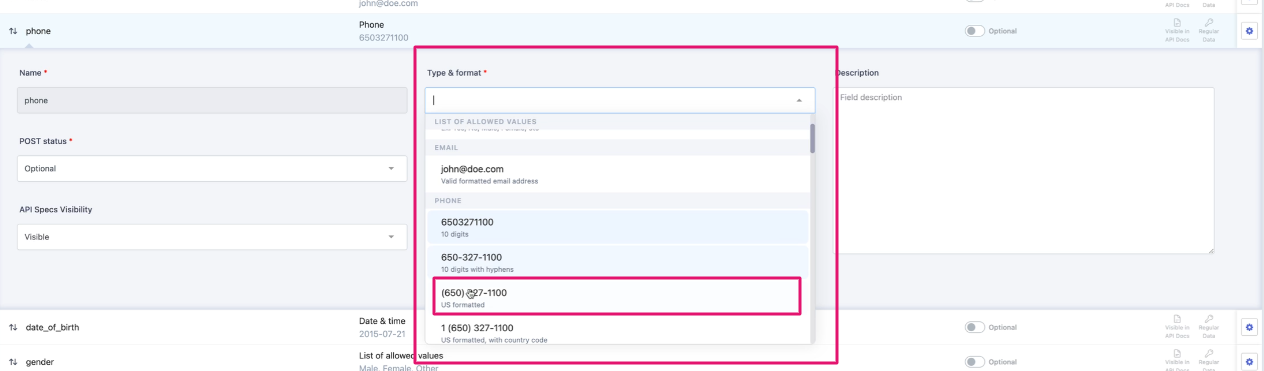
Phone Number Field
- Must be 10 digits
-
Do not include dashes, spaces, or country codes (e.g.,
5551234567is correct)
Solutions:
- Adjust the field output in your form to send only 10 digits
-
Or configure the field inside LeadProsper to accept different formats

Need Help?
If you encounter any issues or need assistance, contact us at support@leadcapture.io