.png)
LeadCapture.io Quick Getting Started Guide
Welcome to LeadCapture.io! This guide will walk you through the essential steps to go from sign-up to launching your first live interactive lead form, just focused quick wins to help you start capturing qualified leads fast.
You came to LeadCapture.io to get more leads, better leads, or build high-converting lead forms faster. That’s exactly what we’ll focus on in this guide.
Whether you're a first-time user or revisiting to fine-tune your setup, this step-by-step resource will guide you through selecting a template, customizing your lead form, embedding it on your website, testing it, and setting up lead delivery.
Table of contents
- Step 1: Explore Our Proven Templates
- Step 2: Customize Your Interactive Lead Form
- Step 3: Turn on Phone & Email Verification
- Step 4: Get Your Embed Code
- Step 5: Add Your Interactive Lead Form to Your Landing Page
- Step 6: Send a Test Lead
- Step 7: Tell LeadCapture.io Where to Deliver Your Leads
- Final Step: Go Live and Review Metrics as They Flow Back in!
- Helpful Resources
How to get help when you need it
There are a few ways to get support when you need it:
- From within the LeadCapture.io app in the bottom right hand corner. Click on the icon and you can either chat with our AI assistance for an instant response, dive deeper into documentation and videos, or reach out directly to our team.
- Email support@leadcapture.io
- Join LeadCapture HQ our private community and post questions
Before we dive into it, some best practices to keep in mind based on what we see the top 1% of lead generators doing…
-
Launch Fast, Iterate Later
Don't obsess over design or copy before going live. Top lead generators keep it simple, launch quickly, then improve based on real data.
-
Don’t Set It and Forget It
The biggest mistake is going live and walking away. Check performance regularly. One LeadCapture.io user doubled conversions on a step just by tweaking how they asked for a name.
-
Keep It Stupid Simple (KISS)
Top performers don’t use bloated lead forms. They stick to 4–7 steps, avoid fancy graphics, and minimize distractions.
-
Make a Compelling Offer
This is what separates high-converting lead forms from low-performing ones. Use the first step to make a strong offer that encourages engagement and then remind the prospect of what they’re getting before they hit submit.
-
Avoid Generic Contact Info Requests
Don’t say “Enter your name.” Give a reason: “Who should we send the quote to?” or “Enter your name to save your progress.”
-
Use Micro-Copy to Nudge Users
Add short text under each step like: “Complete this quote in 30 seconds or less” or “Next: Choose your roof type.”
-
Use the Smart Field Types
Use Google Address Autocomplete to simplify address input. Map the full address behind the scenes using hidden fields.
-
Stop Spam and Improve Contact Rates
Use point-of-capture phone verification. It blocks bots, boosts contact rates, and helps you stand out if you sell leads.
-
Use Lead Engage for a Lift
Turn on the persistent popup widget in the bottom corner. It can increase engagement by 30–60%.
-
Personalize as You Optimize
Pull names and other data from previous steps into future ones using variable tags. Use UTMs and fallbacks to personalize copy dynamically.
-
Enrich your leads
If you’re in mortgage, real estate, home services, or any related industry where you’re capturing property details, then we recommend enriching your leads with our Real Estate API connection to get even more data about your leads. This includes 50+ different datapoints and skiptracing info, simply by capturing the lead’s address.
-
Delay Contact Info Requests
Start with easy, low-friction questions. Ask for contact details later—after value has been built.
-
Embed the Lead Form on a Simple Page
Top users embed the form on a clean landing page with a strong headline, a compelling offer, and social proof. Skip unnecessary sections.
Step 1: Explore Our Proven Templates
What to Do:
-
Navigate to the Lead Forms tab in your dashboard.

-
We always recommend starting from one of our high converting templates.

-
Use filters and categories to browse template types based on use case, industry, or form goal.

- Click Use Template to get started or Preview to see a live example.


Why It Matters: Starting with a proven template saves time and ensures you're working from a layout that’s already been tested for results.
Step 2: Customize Your Interactive Lead Form
What to Do:
-
Update the headline and sub-headline to clearly communicate your value proposition.

-
Add or remove form fields and steps to collect only the information you need.

- Use the Design panel to adjust colors, fonts, spacing, and button design.


Optional Enhancements:
-
Add disclaimer or compliance text using LeadCapture.io’s built in templates to meet legal standards like TCPA, GDPR, and CCPA, especially important if you're capturing phone numbers or using SMS follow-up.

Pro tip: When you enable the compliance text to LeadCapture, the system automatically tags each lead and stores consent with each lead for up to 5 years to ensure compliance. Need more robust compliance features? Check out this documentation on TrustedForm Integration and Using Dynamic Consent

- Conversion boosting tip: Configure conversion boosting features like real time social proof, add an image to your lead form, use radio button icons in your buttons, etc… all of these little enhancements add up to boost conversions
Why It Matters: A clean, branded form that asks the right questions builds trust and ensures you're capturing qualified leads, not just any traffic.
Step 3: Turn on Phone & Email Verification
What to Do:
-
Go to Lead Delivery > Lead Verification inside your form settings.

-
Enable Phone Verification to send a one-time password (OTP) via SMS.

-
Optionally, enable Email Verification if you'd like leads to confirm their email before submission.


Why It Matters: Lead verification helps you stop spam, fake numbers, and low-quality submissions, so your lead list stays clean, qualified, and ready to convert.
- Real-time verification
- Works seamlessly within your Lead Form
- Improves reply and conversion rates by ensuring real contacts
Step 4: Get Your Embed Code
What to Do:
-
Under Settings > Form Mode, set your form to Embedded or All if you want to embed your interactive lead form. Select pop-up if you want it to popup by click or as someone is leaving.

-
Head to the Publish section of your form editor.
-
Copy the Pixel Script provided. Paste right into the body or code block where you plan to show your lead form if you’re embedding it. If you’re setting it to popup across a number of pages then you can either add your pixel script to the header of your site or to the pages where you want it to popup.
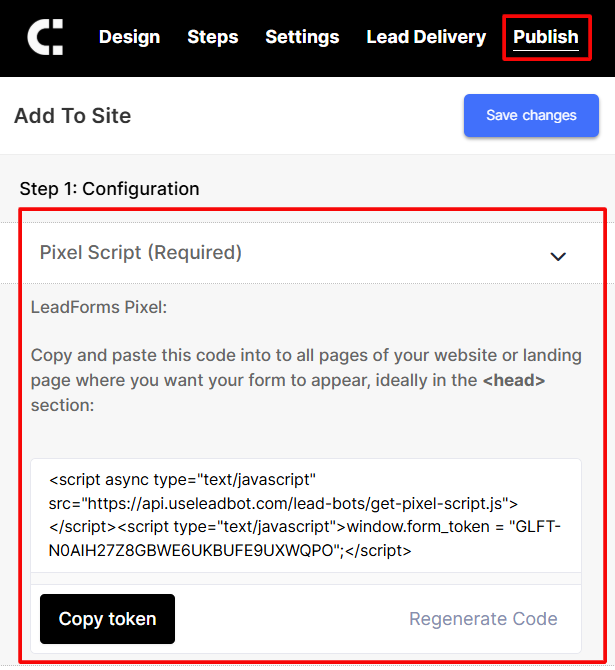
- If embedding only: Copy the Embed HTML Code to use in your site’s layout.


Why It Matters: The pixel script is required for your form to load and report conversions properly. The embed code makes the form appear where you want it.
Step 5: Add Your Interactive Lead Form to Your Landing Page
What to Do:
- If you’re embedding your interactive form, then paste the embed code into the <body> section of your page, exactly where you want the lead form to appear.
- Popular platforms that work well include:
- Unbounce
- GHL
- WordPress
- Webflow
- LeadPages
- Instapage
- Kajabi
- ClickFunnels
- Framer
Need Help?
Access the in-app Help section or read our detailed embedding guide.
Why It Matters: Your lead form won’t be visible until it’s embedded. Getting this right means you’re officially live and ready to convert traffic into leads.
Step 6: Send a Test Lead
What to Do:
-
Visit the page where your lead form is embedded.
-
Fill it out with test data (use a real email or phone number to test delivery + verification).
-
Head to the My Leads tab to confirm it was received.

- Review details like timestamp, source URL, and verification status.


Why It Matters: Testing gives you peace of mind. You can catch form logic issues, typos, or incorrect routing before promoting your page to the public.
Step 7: Tell LeadCapture.io Where to Deliver Your Leads
What to Do:
-
Go to the Integrations section of your form settings.
Choose how you want to receive lead data:
-
Options:
-
Connect With Your Lead Distribution Tool or CRM: LeadProsper, LeadByte, Juiced, Leadspedia, GHL, Phonexia, ActiveCampaign, Salesforce, Hubspot, Mailchimp etc
-
Use Zapier, or Pabbly to trigger workflows
- Webhooks for direct handoffs to your backend
-
-
Optional: Receive SMS and Email lead notifications directly to our servers no A2P or SMTP setup needed: Under Settings > Notifications, enable Email or SMS alerts to get notified instantly when new leads come in.
Protip: If you’re sending leads to clients through email then you can whitelabel the email notifications so they come directly from you and not us!
Why It Matters: Quick lead delivery improves follow-up speed, which improves close rates. Routing them to your systems also keeps your funnel running smoothly.
Final Step: Go Live and Review Metrics as They Flow Back in!
Celebrate Your Progress: 🎉
Your interactive form is live, tested, and integrated, you’re now ready to start generating real leads!
What You Can Do Next:
- Explore our AI Agent tools to:
- Run CRO audits on your landing pages
- Calculate lead velocity rate
- Setup Lead Attribution using our free lead attribution tool
- (Coming soon) Launch AI-powered A/B tests
-
Add conditional logic or multi-step forms for a smarter experience
-
Optimize for mobile with lead form previews
- Review analytics and step based metrics to optimize for even more leads
You’ve done the hard part, now let’s scale what works!
Helpful Resources
Below you’ll find a list of helpful resources and guides to help you get the most out of LeadCaputre.io
-
Integration guides for WordPress, GHL, Unbounce, LeadPages, Framer
-
Integration guides for posting leads: Leadbyte, LeadProsper, Webhook, Zapier
-
Guides in Setting up for Compliance: Jornaya, ActiveProspect
-
Guides in Setting up your TCPA Dynamic Consent with: LeadByte, Leadspedia, LeadProsper
-
How to Create Hidden Fields and Capture UTMs in your Form
-
Set an Entry step inside your Lead Form
-
Customize Your Lead Form's Design
-
Add and Customize and Offer Headline
-
How to change the size of your from
-
-
-